


The HALTER range is available in standard sizes PONY, COB, FULL, and X FULL, so you can typically choose based on the sizes you normally use. However, our sizes are indicative, as the fit can vary from horse to horse depending on breed and build. If in doubt, we recommend checking the guide below for correct fitting.


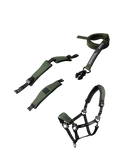
With the HALTER range, you can easily replace the headpiece and noseband. This may be necessary if one of the safety breakpoints is triggered, if you want a new colour, or simply want a clean set after washing or a muddy day in the field.


Each HALTER is equipped with 4 safety break points, located at the ends of the strap set.
The 4 safety break points are tested to withstand a static pull of ~100-160 kg. [Depending on size and model] to minimise the risk of injury if the horse panics while tied up.
Tie the horse on both sides of the halter. The break points are designed to yield to sudden and strong pulls during tying, but withstand normal handling in daily use.
It is important to note that we work with live animals, and many unpredictable situations can arise in daily life. Therefore, we cannot guarantee that the safety break points will always be triggered in all conceivable scenarios. We have designed the product to minimise the risk of injury, but cannot eliminate all hazards.
We do not recommend using HALTER 1.0 if feeding with hay nets.
We always recommend securing your stable and paddock against potential places where the horse can unnecessarily get stuck, to reduce the risk of accidents. Regardless of the type of halter used.


Recommendations and Maintenance
- Adjust the straps continuously as the halter settles into place.
- Ensure even adjustment on both sides of the poll strap so that the halter is centered.
- Free the mane under the mane cut-out.
- Ensure that the poll straps fit snugly around the jaw – without being too tight. The halter is very lightweight and needs to be held somewhat in place.
- Ensure that the buckles of the nose strap are correctly positioned – approximately 3 cm from the cheekbone.
- Ensure that the adjustment under the chin provides enough clearance for the horse to chew and move its jaw.
- Turn the carabiner in your preferred direction.
- Regularly check that all safety 'loops' are correctly positioned.
- Replace worn or damaged straps as needed – to maintain safety.
- When cleaning – rinse straps/buckles with water to remove dirt and mud – or use a soft, damp cloth to wipe the halter clean.
- Allow the halter and straps to air dry, store them in the included breathable bag if desired.
- When tying up the horse, fasten it to both sides of the front buckles of the halter.